Post provided by NATHALIE PETTORELLI & CHRIS GRIEVES

With impact being considered more and more in promotion applications and REF-style (Research Excellence Framework) exercises, science communication is becoming an integral part of a scientist’s job. The problem is: most of us academics aren’t exactly trained in science outreach and our communication styles are heavily biased towards anything written, as opposed to anything visual.
With technological advancements constantly making things easier, however, more and more scientists are taking the plunge and adventuring into the world of YouTube and Vimeo to disseminate their work. But why are they doing so? Is it easy? Do you need expert help or can you do it yourself easily?
This blog post aims to answer all the questions and worries you may have as a scientist thinking of making a video about your work for the first time. To address these worries and questions in the most comprehensive way, we asked 12 authors who recently produced a video about their paper (in some cases their first) if they could give us some insights on their experience, and detail for us the challenges and benefits of choosing this style of communication. Their stories are the background to our story.
Reasons to Make a Video
So, why would you choose to make a video for your newly published article? For some, like Sarah Burthe, it is the case of capitalising on existing resources (in her case video images of nematodes within the stomach of live birds) to promote the work done. For others, like David Warton, it’s about taking the opportunity to try something new and experiment with more creative forms of communication. But often, it’s about getting close and personal with the audience, and making the information more accessible. As Francis Hui pointed out to us, “When you read an article on some new software, there is always that ‘gap’ between reading what it does and practising/implementing it. However, with videos this gap disappears (at least for me!), and you are immersed in the software environment and feel like you are one doing the programming”.
Is Making a Video Difficult?
Once you decide to make a video, how do you go about it? If, like Matt Breece, you have access to a media relations team (and it may well be that you do without knowing it), then pitching them your ideas is probably a good first step.
If not, don’t panic: greatness can be achieved quickly and cheaply! As explained by Meghan Blumstein: “It took me about a day to make the video, start to finish. I went out to Harvard Forest for field work for a day and took video footage on my digital camera and phone in our downtime. I then used the built in iMovie application on my Mac to make the video. I first recorded the audio, which was essentially what I would have written in a blog post, then fit the videos and photos to match the audio story”.
Another possibility is to opt for the interview-type video, something Phil Stepanian recently tried out: “I made a list of the general topics that I wanted to address, and formed some basic interview-type questions. After we had recorded our responses, I edited it all together with some other footage from various field projects”. And then you can of course go the more professional route, like Christina Zdenek, by story-boarding or making dot-point outlines for most of the content before filming so that you know the scenes that need to be shot. Ultimately, how you go about it mostly comes down to resource availability, budget, previous experience and personal network.
But, How Do You Actually Make A Video?
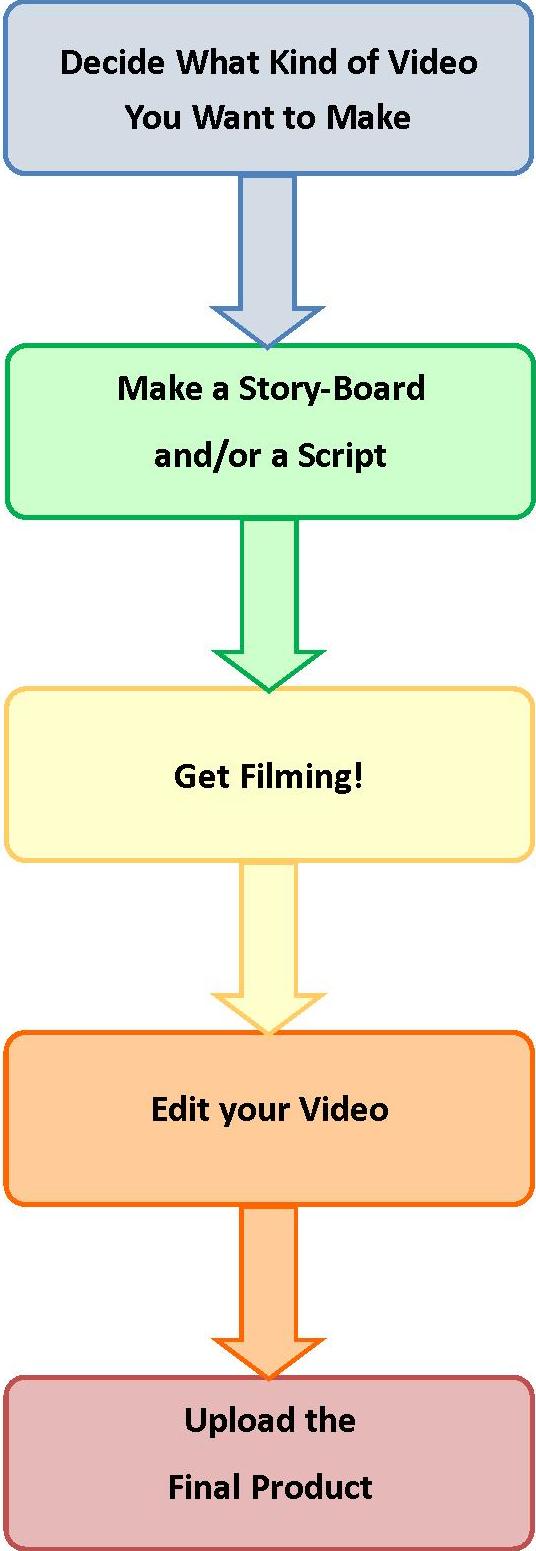
We’ve put together a basic five-step process that will apply to most types of video. One of the best ways to get started though is to find out if there is anyone in your institution who can help you out. A lot of universities will have media departments that can give you guidance, loan you equipment or even help you through the planning, filming and editing process. Check if yours does before you get started
Step 1: Decide What Kind of Video You Want to Make
This seems like quite an obvious first step, but it’s important to think about what you want to do before getting started. A good way to think about this is to try and decide what the aim of your video is. This will largely depend on what your article is about. For example, if your paper describes a new type of software, a ‘walk-through’ style video like Francis’ (above) could be a good choice or if you have an article on a controversial or particularly timely topic, an interview video like David’s with Otso Ovaskainen might work well. Look at what other people have done and find what you like and what fits your work.
Some things to consider at this point are:
- Will anyone be in the video or will it just be voice(s) over images?
- Do you need/want to involve anyone else?
- Do you need to go ‘on location’ to get the shots that you want?
- What software/equipment options are available to you?
- How much time can you spend making your video?
Step 2: Make a Story-Board and a Script
Once you know what type of video you’re going to make, it’s time to plan out how it will run. Breaking your video plan down into short sections makes it easier to work out the flow of the narrative and ensure that you’re covering all the necessary points. Make sure to set out how long you want to have to cover each section and what sort of shots or images you’d like to include.
Making a story-board, or even just a bulleted list of points you want to cover, will help you to keep your video on track and make sure that it doesn’t run too long. Ideally, videos shouldn’t be longer than around 5 minutes. Remember, your video doesn’t need to cover your entire paper – think of it more as a trailer for your article rather than a full movie about it. Communicate the highlights and tell viewers to read your article to find out the details.
Regardless of what type of video you’re making, some sort of a script will be helpful. This could be in the form of text to run along the bottom of the screen while the images play or a list of questions to ask one of the authors. If you’re feeling really ambitious, you can even create some characters and go all out like Rich Fitzjohn did in his video for Diversitree. Once you’ve written your script, read it out loud a few times. This will help you to find any sections that don’t sound natural and, of course, practice makes perfect.
If you’re going to be interviewing one of your co-authors, or having someone interview you, make sure that everyone knows the questions in advance. The more prepared people feel, the more comfortable they’ll be on camera. Your questions (hopefully) should aim to draw out the important sections of the paper from whoever you’re interviewing. David Warton’s interview with Trevor Hastie is an excellent example of this (don’t be afraid to borrow questions from good science interviews that you’ve seen).
Step 3: Get Filming!
This is probably the point that you’ve either been dreading or getting really excited about. This is also where you need to think about your equipment. There are a lot of ways to record your video and it can be difficult to know which choice to make. For a lot of you, the low cost option will be to use technology that you already have. Most phones and digital cameras these days will be able to capture video and laptops generally have some form of webcam that can be set to record. Also, your institution may have more high-tech equipment that you can use – although this may take some training to get up to speed with.
When you are filming, make sure to get at least a couple of takes of each shot that you want. You can’t always tell which is the best version when you’re shooting (especially if you’re outside and it’s bright), so it’s a good idea to have a few options to take you to the next step.
Step 4: Edit Your Footage
This is another part that some people love and others hate. There are a lot of video editing software options available. Our authors who have made videos have used Adobe Premiere Elements 9, Windows Movie Maker, iMovie, Quicktime and more. Really, there’s no wrong option (and there are a lot of free ones). Just find a program that you like and have fun with it.
The amount of editing that you need to do (and in some cases, like a vlog-style video for example, you might not actually need to do any) will depend entirely on the type of video that you’re making. If you’ve filmed an interview, it’s likely that you will only need to add each person’s name when they’re introduced (or perhaps some subtitles). For instructional videos, you may have a little more work to do, placing clips of each section of the process into a single video, or perhaps adding a voiceover or text to explain what is being done.
You can add music or sound-effects (where appropriate) to your video. A lot of these can be found on Creative Commons (including the music used in Christina Zdenek’s video above) and used free of charge.
Step 5: Upload the Final Product
Many journals have their own YouTube or Vimeo profiles and would be happy to upload your video for you. Uploading your video to these channels will ensure that the right audience are aware of it straight away. It also means that people watching other videos uploaded by the journal will be more likely to see (and click on) yours.
If the journal that your paper is being published by does not have this option, don’t worry – it’s still good to have a video for your paper out there. Creating a YouTube account and uploading a video to YouTube is very simple. Once it’s online, you can promote it through your own social media accounts (Twiiter, Facebook, LinkedIn, etc), and ask the journal and your institution to do the same, to make sure that people are aware of it.
And that’s it really: just those five simple steps. As mentioned above, it’s always a good idea to ask your institution if they can support you in any way, especially with your first video. If there isn’t an official media team, don’t be afraid to look for students studying filmmaking, video production or any similar courses. Not only will they be helping you, but you’ll be giving them a great opportunity to get some practical experience and expand their portfolio.
Any Good Tips from Our Interviewees?
“Good lighting (from the front) and good sound”, says David. “There must be plenty of online resources about this, but my low-tech approach is to manage better sound by using my phone mic not my dodgy laptop mic and by staying indoors, and I manage better lighting by sitting people facing a well-lit window. If heading outdoors you will want to think about how to maintain good sound quality (e.g. voice-over from indoors)”.
“Think about the key points that you would like to highlight” says Phil. “You have the opportunity to talk directly to your audience; what do you want to tell them? Think visually. This is a great opportunity to show supplemental figures or animations that illustrate key points. Finally, be concise. Our video was way too long, and I doubt many people had the attention span to make it to the end. You don’t need to cover all of the details in the video; there is a whole journal article available, after all”.
“Try to follow the ABCDs of good science communication from Professor Susan Jacobson”, recommends Christina. “Attractive, Brief, Clear and Dynamic. Short, three to five minute videos are best because people don’t have long attention spans. Make every second count—every scene should have a purpose”.
Ultimately, “do not stress about it too much”, says Meghan, and we couldn’t agree with her more. “Given technology these days, it’s pretty easy to put together something more creative than an article. Go for it and be creative, you have nothing to lose by doing so”.

Here is my video that describes the methods I have been using in my research of Eleonora’s falcons, hope it could be inspiring:
Make a video…
Intro
Long talk about what we are going to talk about
Mention the sponsor
Mention the benefits of linking and subscribing
Start discussing the subject
— say in one second what is the solution
Mention the sponsor
Talk again about subscription, video description and liking the video
Thanks for watching… Why? The viewer should say thanks fore entertaining him, not the video creator who spent energy, equipment, planning, etc just to make a video.
Back to the subject. A small written article is far better than spending a long time to hunt down the 2-second information in a 5 minute video…